A flush median (also referred to as a painted or hatched median) is an area to the centre of the roadway that has been marked to restrict through traffic movements to the adjacent lanes and / or typically as part of a right turn lane.
A flush median can be used in both rural and urban areas. Examples of these are shown in:
The TCD rule (clause 7.4) states that:
A road controlling authority may mark a flush median on a roadway if it is considered that there would be safety and efficiency benefits in:
- separating turning traffic and through traffic; or
- providing pedestrians with place to pause while crossing a road; or
- providing greater separation between traffic travelling in opposite directions; or
- limiting the lane widths to reduce traffic speed.
A flush median must comprise an area marked by white diagonal lines that are painted along the middle of the roadway and are bounded by approximately parallel, longitudinal white lines.
Refer to Figure 2‑5 for flush median layout diagrams
Flush medians are generally not used in rural areas as there are less accesses and therefore, there is less need for turning protection and historically they have been used illegally to overtake other vehicles. Wide centre-lines have been increasingly used in some places instead of flush medians to provide better head on protection than a standard centre-line.
Where in the special circumstances, flush medians are used in rural areas to accommodate turning movements they should be marked as specified in Table 2‑8.
In addition, if flush medians are used as an area from which to turn, sight distance needs to be considered.
Further information on application and safety benefits of using flush median on rural roads can be found within the High-risk rural roads guide.
Figure 2‑3: Example of a rural flush median

Figure 2‑4: Example of an urban flush median

Flush medians should be marked as specified in Table 2‑8. Flush medians must be marked with diagonal lines that join directly into the border line, ie with no gap.
Table 2‑8: Flush median road markings on rural and urban roads
|
Application |
Standard |
|---|---|
|
Colour (diagonal lines and border lines) |
Reflectorised white |
|
Total width of flush median |
1.0m (minimum) refer note 1 |
|
Diagonal lines |
|
|
Width |
900mm (rural) |
|
Bar spacing |
|
|
Slope |
2:1 |
|
Border lines |
|
|
Width |
100mm |
|
Stripe |
Continuous |
Table 2-8 notes:
To give pedestrians an extra measure of safety, solid pedestrian refuges should be located at points where there are higher pedestrian volumes if the width of the flush median permits this. Further information on pedestrian crossings within flush medians is provided in the flush medians section.
The recommended ranges for bar spacing on flush medians for both urban and rural roads are listed in Table 2‑9.
Table 2‑9: Diagonal line spacing
|
Median length |
Recommended range for bar spacing |
|---|---|
|
< 100m |
6m to 12m |
|
100m to 500m |
10m to 15m |
|
> 500m |
12m to 20m |
Border lines on flush medians should be tapered as indicated by the following formulae and shown in Figure 2‑5.
The approach and departure tapers length (L) are based on a sideways movement of approximately 0.6 m/s.
![]()
Where:
L = taper length (rounded to nearest 5m) on approach and / or departure
V = 85th percentile traffic speed (km/h)
Y = lateral shift (median width, in metres, as measured from the road centre-line) on approach and / or departure
Figure 2-5: Flush median markings
(b) End treatment details
View larger image [JPG, 1.6 MB]
Also refer to features, structures and hazards on, beside or above the roadway for features and structures in the road for additional information on median islands.
Features, structures and hazards on, beside or above the roadway
Flush medians need to be seen by drivers and pedestrians in adverse light or weather conditions. There are various ways of achieving this:
Further consideration should be given to the type of surface they are applied to, for instance:
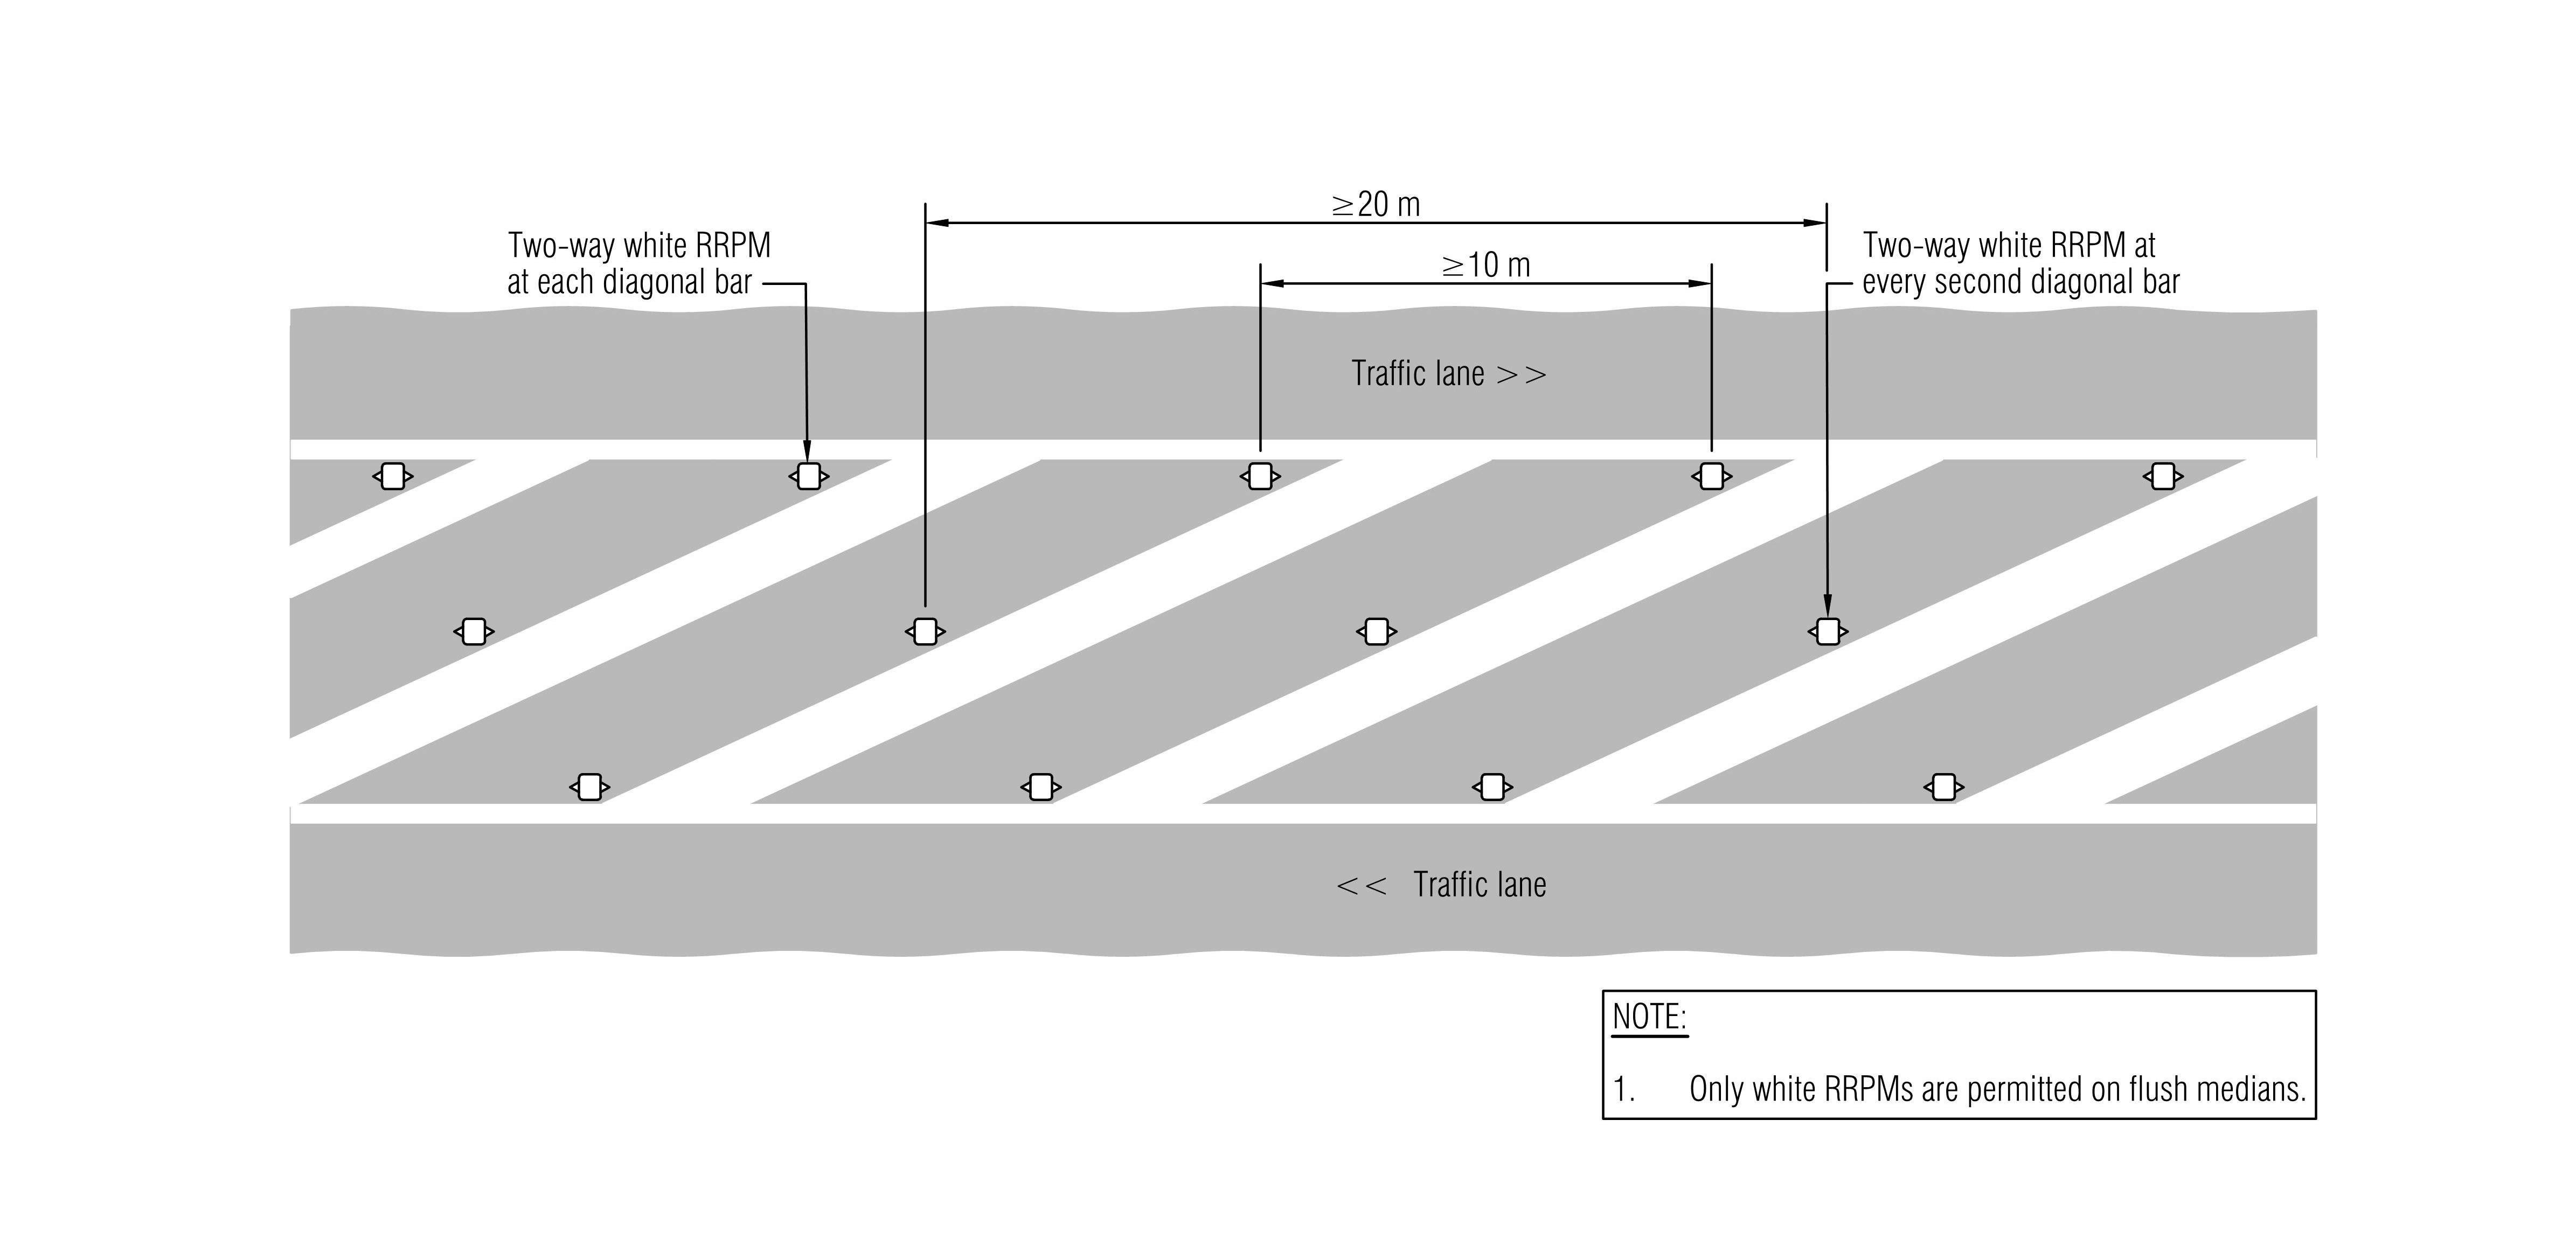
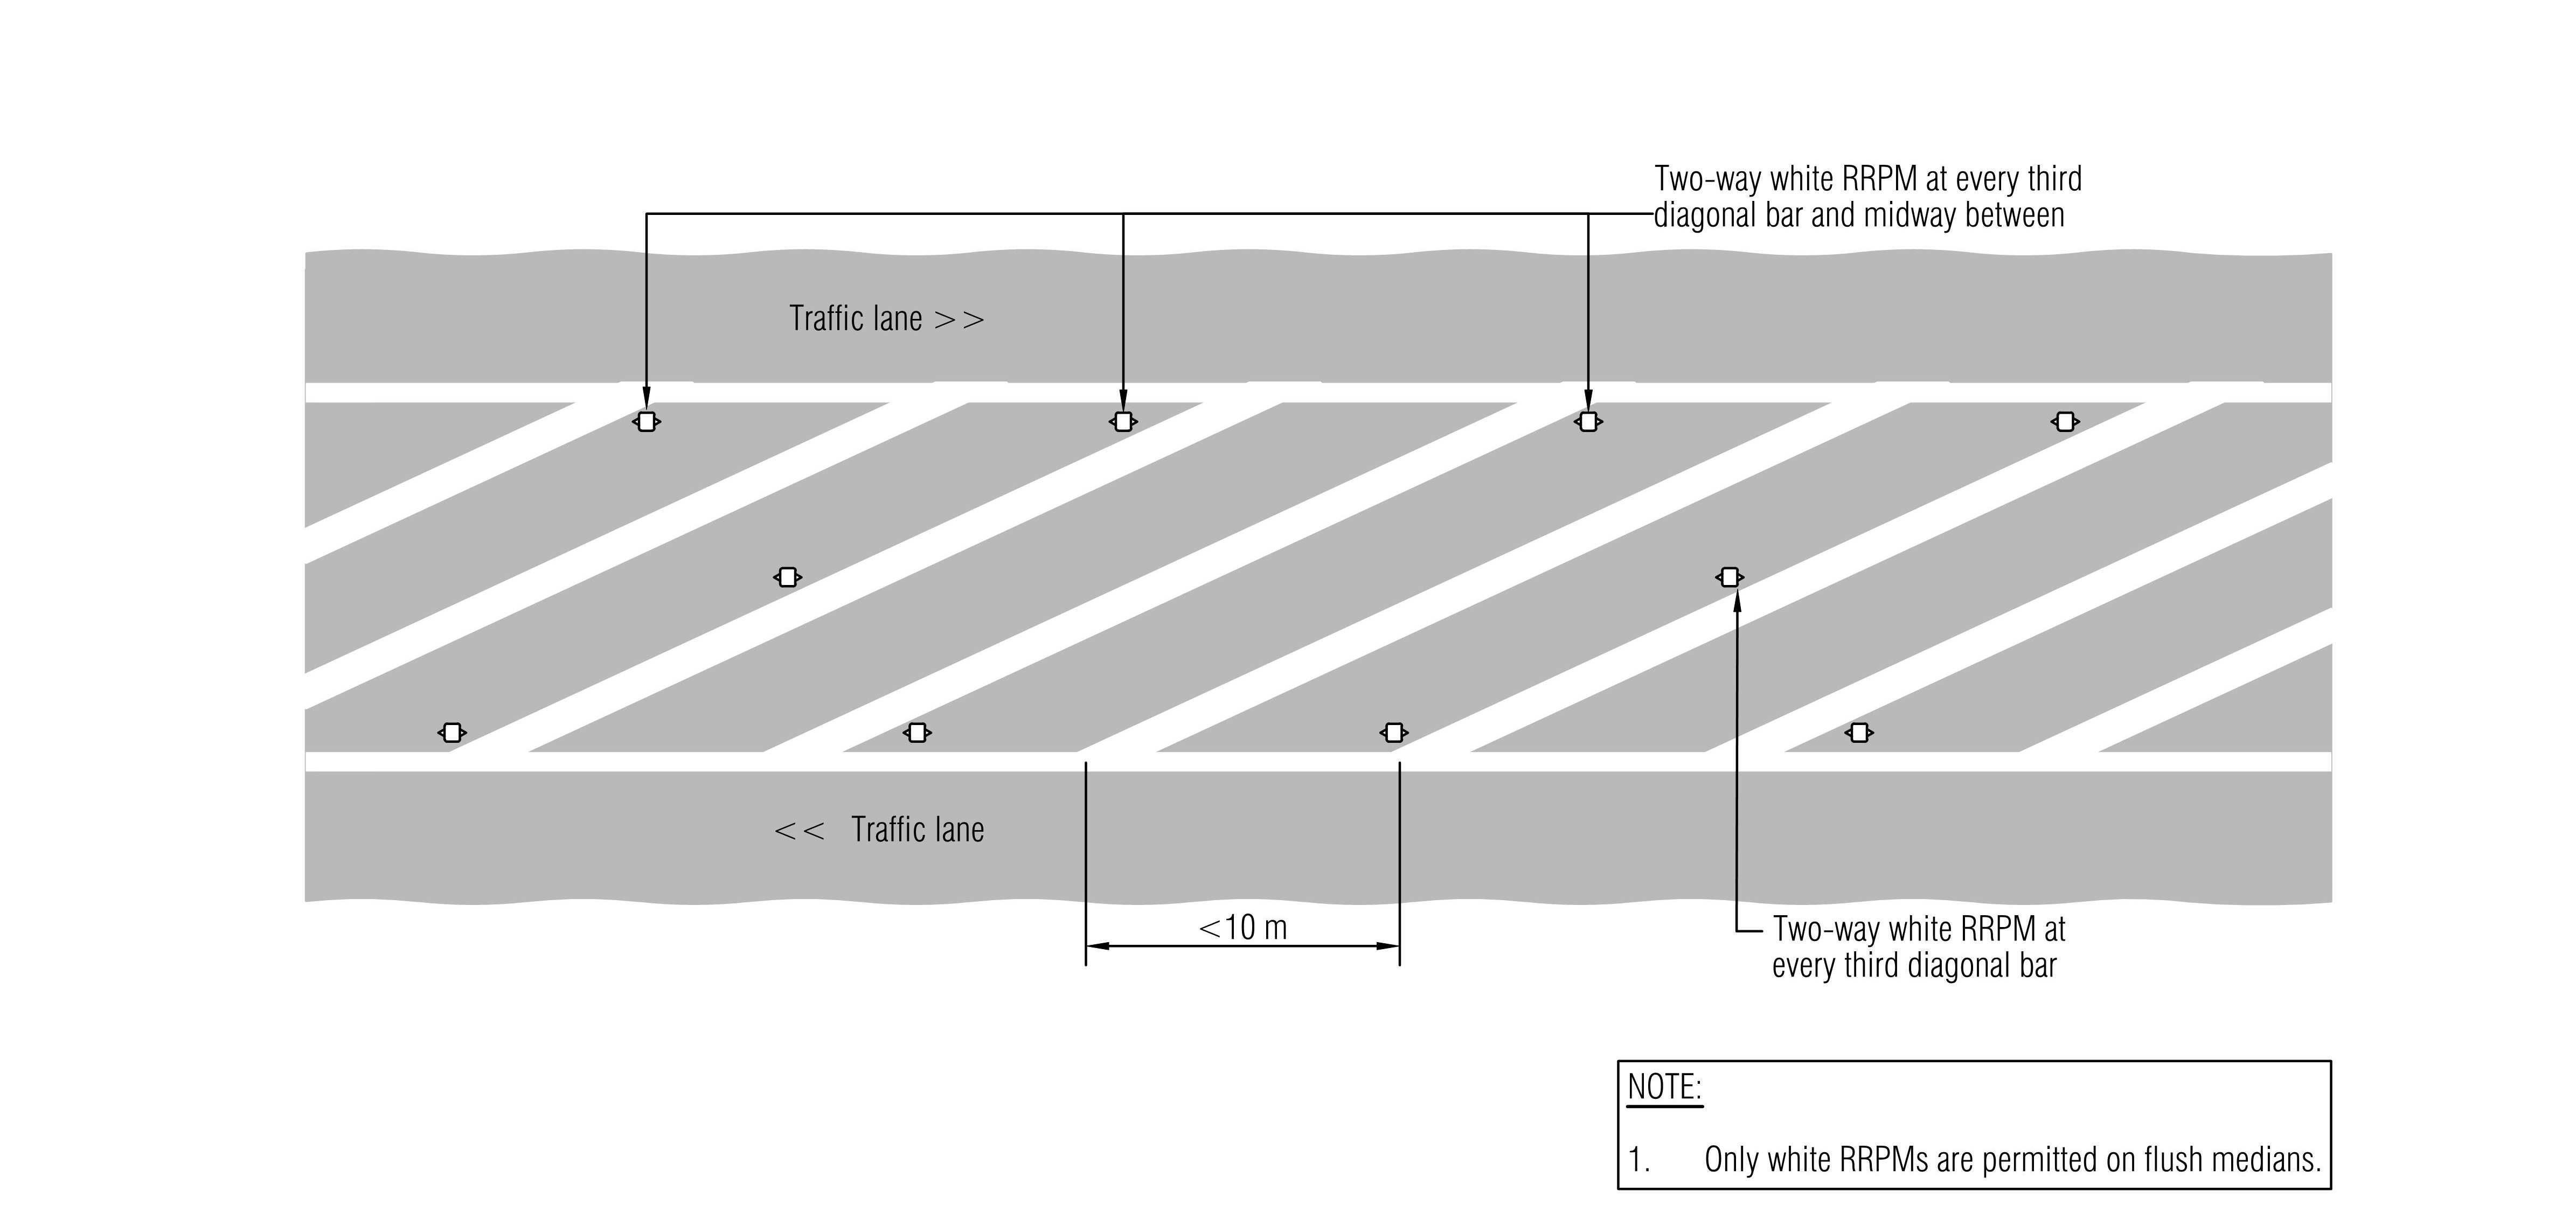
The placement of retroreflective raised pavement markers (RRPMs) on urban flush medians is optional; however, RRPMs should be used on flush medians provided on state highways. RRPMs, if used, should be as shown in Figure 2‑6 and as defined below:
Figure 2‑6
Addition information can be found in the raised pavement markers section
Figure 2-6: Flush median retroreflective raised pavement marker arrangements
(a) RRPM arrangement for medians 1.0m to 2.4m in width
It is desirable to minimise the number of pedestrians crossing on sections of road with flush medians without dedicated pedestrian crossing facilities. To give pedestrians an extra measure of safety, solid pedestrian refuges should be located at points where there are pedestrian desire lines, if the width of the flush median permits this.
Refuges are especially necessary where pedestrian usage is high, and at pedestrian crossings. Where pedestrian usage is spread along the median, refuges should be constructed approximately every 400m. Refuges should be installed at points of good visibility and where they can be well-lit. They also reinforce the prohibition on overtaking on flush medians, but as with any solid object in the roadway, refuges can be a hazard to errant vehicles if not correctly delineated. Pedestrian refuge details within a flush median are provided in Figure 2‑7.
For pedestrian refuges:
Where pedestrian crossings (zebra) are marked:
Further information on pedestrian refuges can be found within the:
Figure 2-7: Pedestrian refuge details